
The Markup, now a part of CalMatters, uses investigative reporting, data analysis, and software engineering to challenge technology to serve the public good. Sign up for Klaxon, a newsletter that delivers our stories and tools directly to your inbox.
It’s a new era in entertainment for kids. Everywhere you look, new toys and devices are marketed toward children with smart features. Gift guides and store shelves tout Bluetooth- and Wi-Fi-enabled devices for kids, which promise an iPad-native generation a better way to play.
But are those toys secure? And precisely what data is being handed over when a kid is using these toys?
There are real reasons for concern: This year, the FTC hit Amazon with a $25 million fine because Alexa devices were storing recordings and transcripts of children’s voices, which the company retained even after parents requested deletion of the data. It’s just one of the many devices that could be recording your children’s speech or tracking their behavior.
The Markup is looking into what other toys collect private data on your children. The FBI recommends parents do their own research on digital toy privacy but offers no advice on how to actually do so. We’re here to help.
The BreakdownPrivacy
How to Quickly Get to the Important Truth Inside Any Privacy Policy
An investigative data journalist and a former tech lawyer teach you how to spot tricks and hidden disclosures within these interminable documents—and even how to claw back some privacy
The first step is to read the privacy policy for a toy and, if applicable, its companion app. In particular, pay attention to what information is being tracked, how the info is used, and what partners that info is shared with. It might also include a section about the toy company’s compliance with the “Children’s Online Privacy Protection Act” for protecting children under 13.
The next step is to figure out whether your device uses Wi-Fi, Bluetooth, or both; that information should be displayed on the toy’s box or in the instruction manual. A Wi-Fi-enabled toy will likely communicate with your wireless router to send data to the internet (though, in limited circumstances, the toy may also communicate with other devices on the same Wi-Fi network). Meanwhile, a Bluetooth toy will send data to another smart device, such as a smartphone, which may then relay that data to the internet using Wi-Fi or cellular data.
Then, grab your computer (and your smartphone if your toy uses Bluetooth). Our instructions assume you’re using macOS and iOS, though the tools below also have Windows or Android (for HTTP Toolkit) alternatives. We have not tested these instructions on Linux, but they should work there as well.
Bluetooth Toys
If your toy supports Bluetooth, it’s likely that it needs to connect to a smartphone app to function. For example, this ”Encanto” karaoke machine uses the “EZ Link” app on the iPhone or Android.
To capture traffic from a Bluetooth device, you will need to use a man-in-the-middle proxy that intercepts and monitors the network traffic between the device you want to monitor and the internet. We recommend using HTTP Toolkit, which has a nice interface and works on most operating systems.
To find out what your toy is up to, follow the steps below (modified from the instructions here).
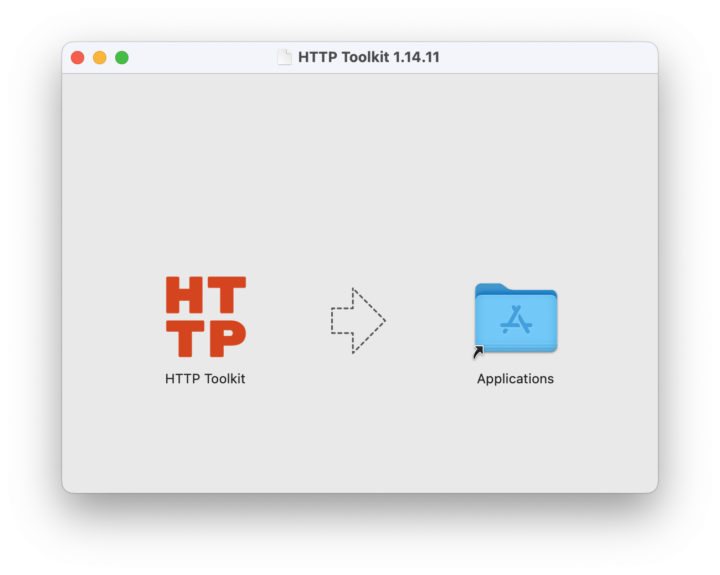
- Step 1: On your computer, download the HTTP Toolkit installer for macOS. When you open up the installer, you’ll drag the app to your Applications folder (see below).
- Step 2: Ensure your smartphone and computer are connected to the same Wi-Fi network.
- Step 3: Find your computer’s local network IP address by going to System Settings > Network > Wi-Fi. Then select the Details button (see below). Note the IP address listed there; you’ll be entering it into your smartphone in Step 7.
-
Go to System Settings > Network > Wi-Fi. Then select the Details button, shown below. 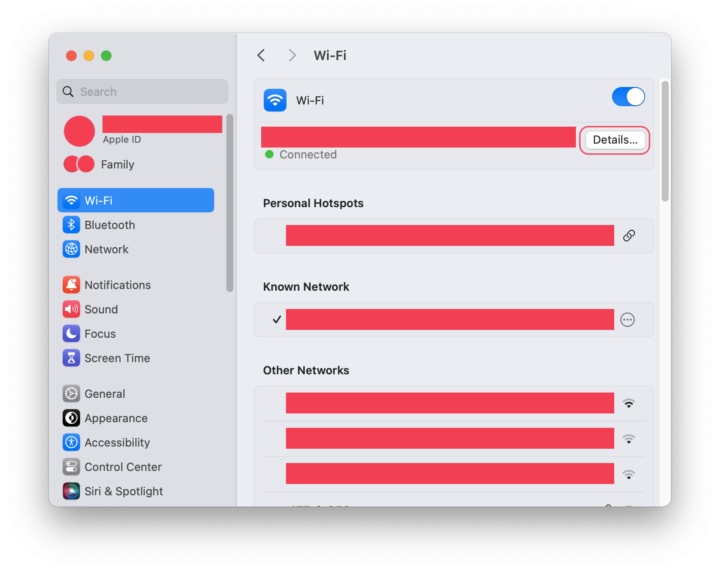
-
Note the IP address, circled below. 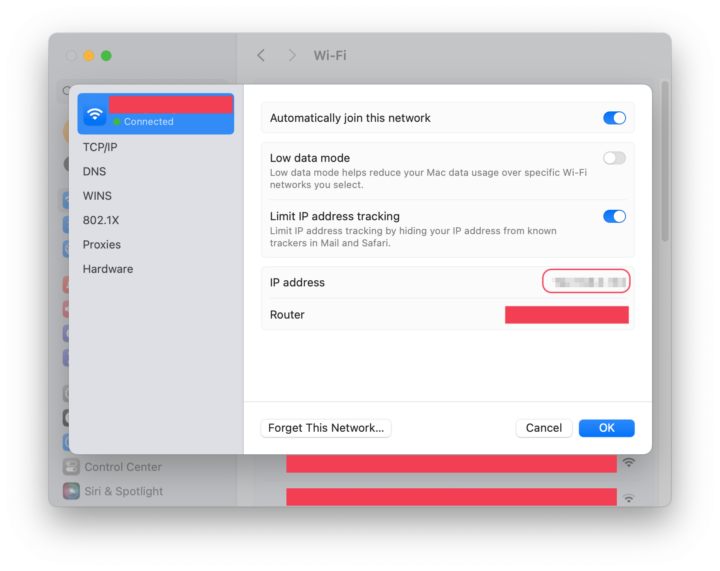
- Step 4: Go to your Application folder and open HTTP Toolkit. If you have an Apple Silicon chip, your computer may ask you to install Rosetta, which is an Apple compatibility layer for older Intel software. Go ahead and click “Install.”
You may get an alert that says, “‘HTTP Toolkit’ is an app downloaded from the Internet. Are you sure you want to open it?” Yes, it’s OK to open it. - Step 5: Once HTTP Toolkit is open, you should automatically be on the Intercept HTTP page. Scroll down a bit and select the “Anything” box.
- Step 6: Now we’ll configure our smartphone to use the proxy. Go to Settings > Wi-Fi. Then select the ⓘ icon next to the Wi-Fi network you’re connected to. Scroll down the screen and select Configure Proxy. Select the Manual option.
- Step 7: Under “Server,” enter the IP address you saved from Step 3. Under “Port,” enter “8000,” which is HTTP Toolkit’s default port setting (as long as you didn’t change anything). You don’t need to toggle “Authentication.” Make sure you change your phone’s proxy setting back to “Off” after you’re finished monitoring your toy. Otherwise, you won’t be able to connect to the internet. (We’ll remind you again at the end of these steps.)
- Step 8: HTTP Toolkit shows data from every app on your phone all at once, so if you’re running too many apps on your device, it may be difficult to see which traffic is coming from the toy. Before you go further, we recommend closing any apps by swiping up from the bottom edge of your phone and swiping up again on each open app.
- Step 9: Then, go to Settings > Battery and turn on Low Battery Mode, which pauses any apps from updating or sending traffic in the background. We’ll remind you to turn Low Battery Mode back to “Off” after you’re done monitoring your toy.

- Step 10: Finally, go to Settings > Privacy & Security. Turn off Tracking (the second option on the screen), then scroll to the bottom of the screen to find Analytics & Improvements and Apple Advertising. Turn those settings off as well. We recommend keeping these settings off after you’re finished checking the toy.
- Step 11: Return to HTTP Toolkit on your computer, and download the root certificate by selecting “Export CA certificate.” Internet traffic is usually encrypted between your computer and the destination server, but the root certificate allows HTTP Toolkit to act as the “destination” for your traffic and intercept it.
- Step 12: Email or AirDrop the certificate to your iPhone.
If using email, open with the built-in Mail app, which is the only iOS mail app that can open certificates. If using AirDrop, accept the request.
If you get a “Choose a Device” prompt, select “iPhone.” You should see a “Profile Downloaded” message on your phone after sending the certificate. Close this. - Step 13: On your iPhone, go to Settings > General > VPN & Device Management. You should see “HTTP Toolkit CA” in the “Downloaded profile” section. Click on it, then click “Install” in the top right corner. You may be prompted to enter your passcode. Click “Install” again.
Then, go to Settings > General > About > Certificate Trust Settings and enable "Full Trust" for the HTTP Toolkit certificate. - Step 14: Head back to HTTP Toolkit on your computer and switch to the “View” tab on the left. You should see a bunch of text flying by on your screen. Each line of text is a piece of data that’s being sent by your phone to the internet, including from iOS and any apps you have running on your phone that may be doing things in the background.
- Step 15: As a test, open an internet browser on your phone and navigate to any website (themarkup.org, for example).
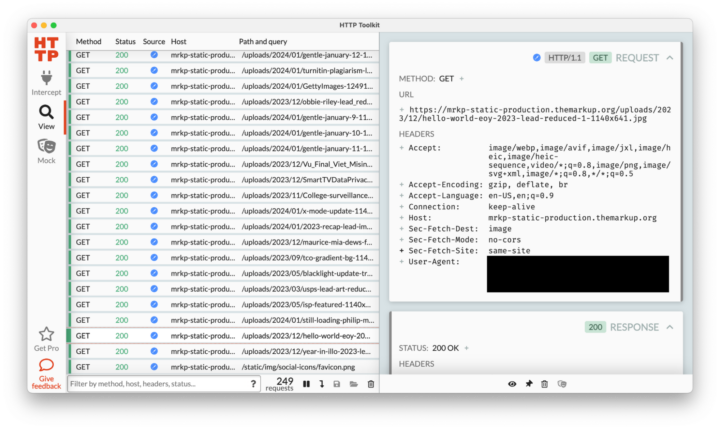
- Step 16: If your window looks like this, congrats! Click on a line to get more details in the right window pane. For example, in the image above, the third line from the bottom shows that Safari downloaded an image from the Markup homepage.
Reminders: When you are finished monitoring your Bluetooth device, make sure you return your computer and smartphone to its original settings:
- On your computer, quit HTTP Toolkit.
- On your phone, change the Wi-Fi proxy setting on your phone back to “Off”; otherwise, you will not be able to connect to the internet. Turn on “Wi-Fi assist” if you prefer to keep it on. Then turn off “Low Battery” mode.
- To remove the root certificate from your phone, go to General > Settings > VPN & Device Management. Select “HTTP Toolkit CA,” then select “Remove Profile.” Select “Remove” when prompted.
We tested these instructions on the “Encanto” karaoke machine and monitored the network traffic as we configured the toy using its EZ Link app. The app asked us to enter a birthday and choose which music streaming service we wanted to use. The app is very basic: When you push the big button on the front of the karaoke machine, it sends a notification to your phone with a link to the “Encanto” soundtrack on the streaming service you’ve chosen.
We then tried all the features on the toy, including playing music, using the microphone, and recording to a USB drive. Overall, HTTP Toolkit finds … nothing! It turns out this app is very secure and doesn’t send any data. Nice going, eKids.
Wi-Fi Toys
Wi-Fi-enabled toys connect directly to your wireless network, so they require a different method of tracking. There are expensive ways to track Wi-Fi toys, including buying a separate adapter, but we’ll show you how to track these toys for free using IoT Inspector, a research tool that allows you to monitor the network traffic of IoT devices on your home Wi-Fi.

Privacy
Use Our Game Safety Buddy to Protect Your Kids and Yourself on Gaming Consoles
Our tool and advice can help you navigate the overwhelming number of settings on today’s game platforms.
Caveat: IoT Inspector may have bugs. Running it might interfere with your network, and, in the worst case, could require you to restart your router. Not every toy is guaranteed to function correctly while IoT Inspector is running.
⚠️ Do not run IoT Inspector on any network that you do not own. It is only safe to run IoT Inspector on your home Wi-Fi.
- Step 1: Download and run IoT Inspector on your computer. If you are using Windows, you can download the zip file here, extract it, double-click “IoT Inspector,” and then skip to Step 7.
- Step 2: If you are on a Mac, open the Terminal app. It can be found by opening Finder, navigating to Applications > Utilities, and opening “Terminal.”
- Step 3: Install macOS’s command line tools by copying
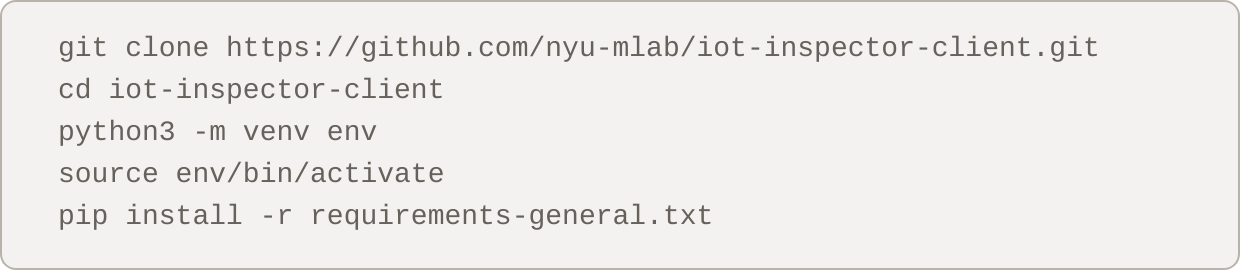
xcode-select --installinto the Terminal window, and press your ↵ Return (or ↵ Enter) key. This might take some time to install. If the tools are already installed, update your software in System Settings before continuing. - Step 4: Next, we will download and configure IoT inspector. Copy and paste the following block of code into the Terminal and hit Return.
git clone https://github.com/nyu-mlab/iot-inspector-client.git
cd iot-inspector-client
python3 -m venv env
source env/bin/activate
pip install -r requirements-general.txt
- Step 5: Start IoT Inspector by pasting the following block of code into Terminal and hitting Return. Your Terminal may ask you for your password. If it does, type your computer account password into the Terminal—it won’t show you typing, but it works!—and press Return.

- Step 6: Copy the “Network URL” that appears in the Terminal, and paste it into your web browser.
- Step 7: Agree to the terms and warnings associated with running IoT Inspector. Optionally, you may consent to share your network data to the IoT Inspector research project at NYU. See the Privacy Policy for more info on the data it collects.
- Step 8: Once IoT Inspector is open, you will see a list of devices running on your home network. Each entry lists the device’s local IP address (for internet connectivity) and MAC address (akin to a hardware serial number). For example, the second device in the image below has a local IP address of
192.168.12.164and a MAC address ending in9c:a4:1f.
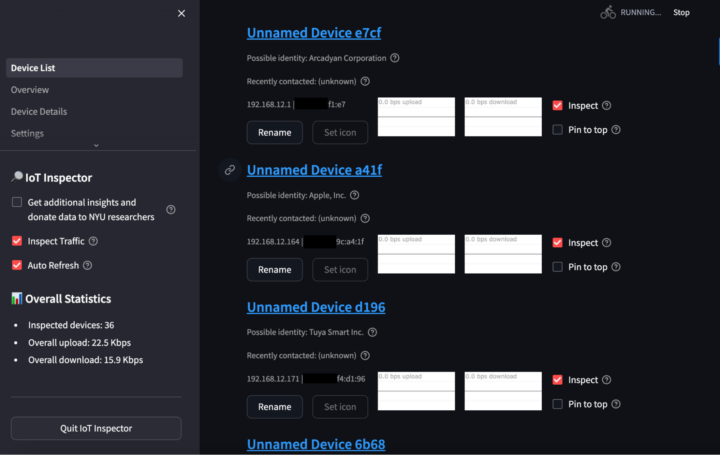
- Step 9: IoT Inspector will try to identify the manufacturer of devices on your network. For example, the second device in the image above is guessed to be an Apple device. However, this guessing is not perfect. If you have never connected the toy to your home network, finding the toy is as simple as connecting the device and clicking the new device that appears at the bottom of the list. Otherwise, you will need to identify the toy by various means. The toy might display a MAC or local IP address in its settings or on a connected phone app that will help you identify the device. If not, try performing actions on the toy and see if one of the devices in IoT Inspector starts reporting more traffic.
- Step 10: Once you’ve identified the toy, uncheck “Inspect” for all other devices on the network so that you are only monitoring the toy you care about. When you click on the toy, you will see all traffic—though unlike Bluetooth devices, IoT Inspector will only show you the domains being contacted, not exactly what data is being sent.
Reminders
- To quit IoT Inspector, click “Quit IoT Inspector” in the bottom left. If this does not work, go back to your Terminal and hit Command + Q or click “Terminal” in the top left of your screen and then “Quit Terminal.”
- When you are finished monitoring your toy, we recommend going to IoT Inspector’s “Settings” and clicking “Reset IoT Inspector” to clear the list of devices. Otherwise, you might see old devices in the list the next time you run IoT Inspector. If you opted into sharing your network data with NYU researchers, you may also delete your shared data here.
Rerunning IoT Inspector
- Step 1: To rerun IoT Inspector later, open Terminal and run the following lines of code:
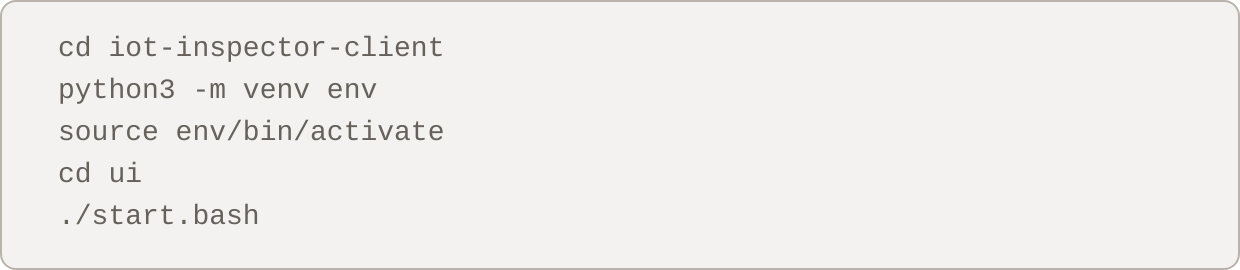
- Step 2: Then, go back to Step 6 and continue the instructions from there, skipping Step 7 since you’ve already agreed to the terms and warnings.
With some toys, you may find that they are sending data to strange domains. Try to look for correlations between your actions and data. For example, if you turn on a toy’s camera and see large amounts of data being sent while the camera is running, this suggests the toy is sending camera data. All of this analysis should be combined with reading the toy’s manual thoroughly and experimenting with the toy’s various actions to understand its full capabilities.
We tried these instructions on a Tamagotchi Uni and found that the toy only sends data to aws.amazon.com. The Uni uses Amazon AWS to manage its online connectivity. When starting up the Uni for the first time, the toy only asks for a nickname and birthday. We could not confirm further what data is being sent to Amazon.
Try these monitoring tools on your own toys and let us know if you find anything strange (or have any questions) at ross@themarkup.org. We’d love to hear from you!